Kiosks

Track activity when visitors sign in to kiosks.
Access the Attended Kiosk from the hub or in Kiosks, or by appending /kiosk to your KeepnTrack URL.
Access the Self-Service Kiosk from the hub or in Kiosks, or by appending /selfservice to your KeepnTrack URL.
Table of Contents
KeepnTrack’s Kiosks are what the majority of your users—volunteers, students, staff, vendors, and visitors—will interact with; they are used to sign people of all roles in and out of your facilities, according to the kiosk setup. For example, you can set up a self-service Kiosk near the back door of the cafeteria—used specifically for vendors to sign in and out.
First, set up your kiosks in Kiosk Builder. Then choose workstations (specific computers/tablets) to be used as kiosks for visitors to sign in. On those machines, open up and log in to either an attended or self-service kiosk, configure Kiosk Settings, then get ready to let visitors sign in to Activities!
Kiosk Builder
Set up the look of your Kiosks.
Attended Kiosk
A kiosk meant to be attended by an operator.
Self-Service Kiosk
A kiosk meant to stand alone with no operator.
Signing in to Kiosks
Visitors sign in to kiosks by either entering their ID, or their name and birthdate.
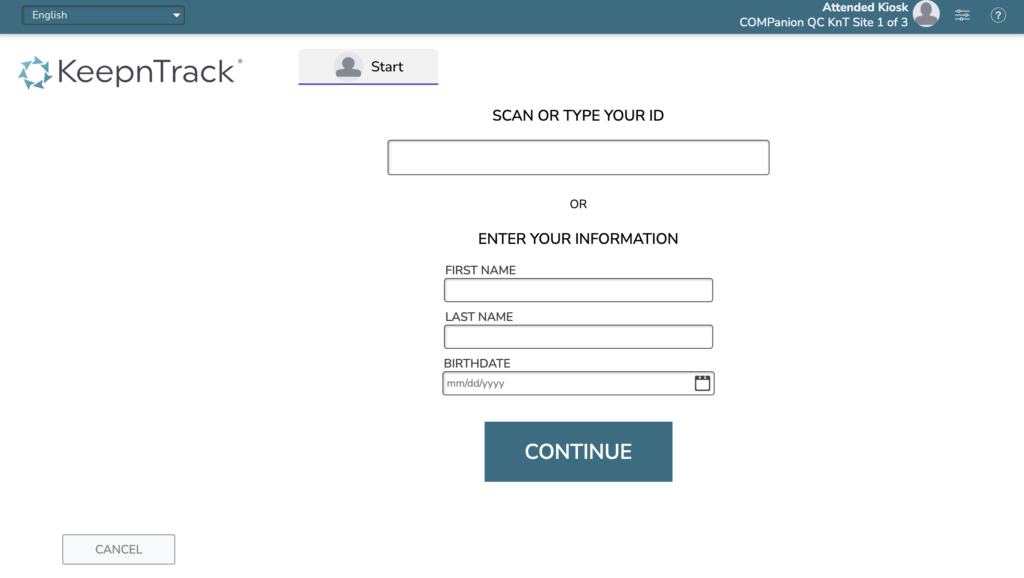
The steps to sign in:
- Step 1: Identify yourself. They enter their barcode or name.
- Step 2: Choose your role. If they choose a role they aren’t authorized for, they won’t be able to continue.
- Step 3: Select the activity you are signing in for. This step is skipped if there is only 1 activity for this role.
- Step 4: In or out?
- If you are already signed in to one or more activities, you’ll get the chance to sign out from those.
- Success! You have signed in.
Possible errors:
- Insufficient data. This is when they don’t provide name or birthdate when trying to sign in.
- User matching. KeepnTrack attempts to match the user based on the data they entered and the users in the system. Sometimes there are multiple matches; at an attended kiosk, the operator can choose the correct one—at a self-service kiosk, the visitor won’t be able to continue. If there is no match, the user may be able to create a new user account (depending on kiosk settings), or they won’t be able to continue.
- Security Checks. If a check is run on a user and there are possible matches, then at an attended kiosk the operator (if they have sufficient permissions) can make a determination and allow the person to sign in (or send them away). At a self-service kiosk, the visitor will be prompted to see an operator.
- Status. If a user is not Active status, if they have a Determination other than Allow, or if their Volunteer Role is expired, they will not be allowed to sign in.
- Wrong site. If a user belongs to site A, they are not allowed to sign in to site B as anything other than a Visitor.
Make sure the user is authorized for the site under the Users > Roles.

All users who are still signed in to kiosks at midnight (your time) will be automatically signed out. Volunteer hours will be calculated from Minimum Minutes Awarded.
Self-Service vs Attended
The Self-Service kiosk is almost identical to the Attended Kiosk, with the following important differences:
- It says Self-Service in the topnav.
- Logging out or accessing Kiosk Settings require operator authentication.
- Multiple matches leads to a ‘can’t sign in’ error.
- Kiosk Settings defaults “Allow new visitors” OFF.
- Kiosk Settings kiosk name defaults to Self-Service Kiosk.
- Kiosk Logo is NOT clickable in self-service. (Visitors won’t be navigated out of the browser tab.)
- The Who’s here now report is only available on the Attended kiosk, since it’s for operators.
Which kiosk should I use?
Attended Kiosk. An Attended Kiosk requires visitors to sign in/out through a school secretary or the front office, guaranteeing that everyone entering and leaving your school is monitored, not only by KeepnTrack, but also by actual school personnel. Potential sex offender and background check results are reviewed by KeepnTrack operators at an Attended Kiosk so that the appropriate action can be taken, including allowing access.
Self-Service Kiosk. The Self-Service Kiosk allows people to sign themselves in and out at designated stations without the help of school staff—saving both time and resources. This is most efficiently done with KeepnTrack ID tag cards; however, if you don’t use those at your facility, visitors only need to provide their name and birthdate. However, a Self-Service Kiosk has no administrative functions, allows no management decisions, and can not be used to review potential sex offender or background check matches. Questionable individuals who are flagged attempting to sign in through a Self-Service Kiosk are always directed to the main office for further evaluation.

Express Mode. Express allows you to quickly sign multiple people into or out of a single activity, which is especially useful for activities that have a large number of people, such as a sporting event or for students who arrive late. An example of how the Express Kiosk might be used would be in the event a visiting sports team’s bus arrives late and it is necessary process all the team very quickly. By logging in to a kiosk, going to settings and prepping the Express mode, you can lock in the activity, thereby allowing you to sign in all of the team quickly. Express Mode is available in both Attended and Self-Service kiosks.

Can I use my phone?
Kiosks can be used on a laptop, desktop, tablet, phone—signing students in for a field trip is as easy as pulling up your attended kiosk on your mobile device, signing in, and entering their barcodes.
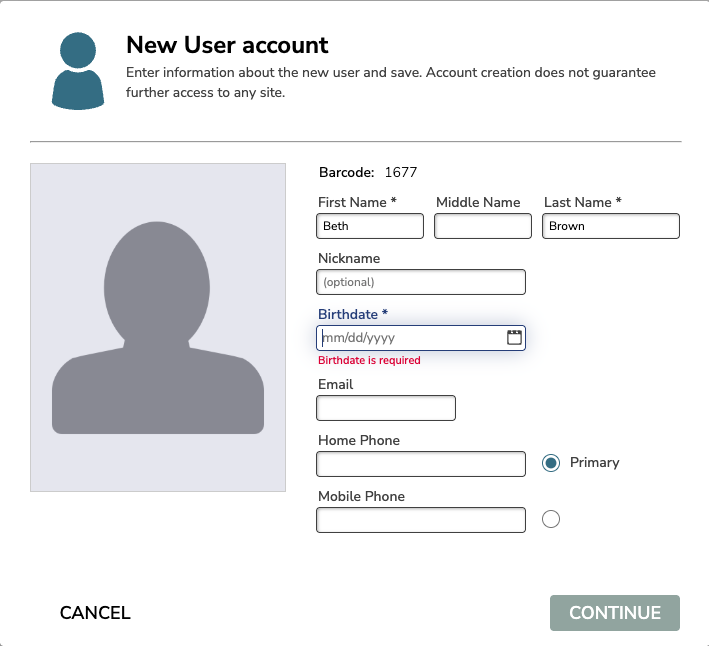
New User account
If new visitors are allowed, and an unrecognized user signs in, you will have the option to create a new account (user record). If you have a camera you might take a picture to store with their record that helps you identify them later.
Names and birthdate are required.
Existing users can also update their information after signing in.
Why is my camera not working?
The first time you use the camera on your device, you will need to give the browser permission to access it!
Kiosk Settings
Kiosk settings are specific to this kiosk. That is, if you clear your cache, the kiosk settings will also clear at this time.
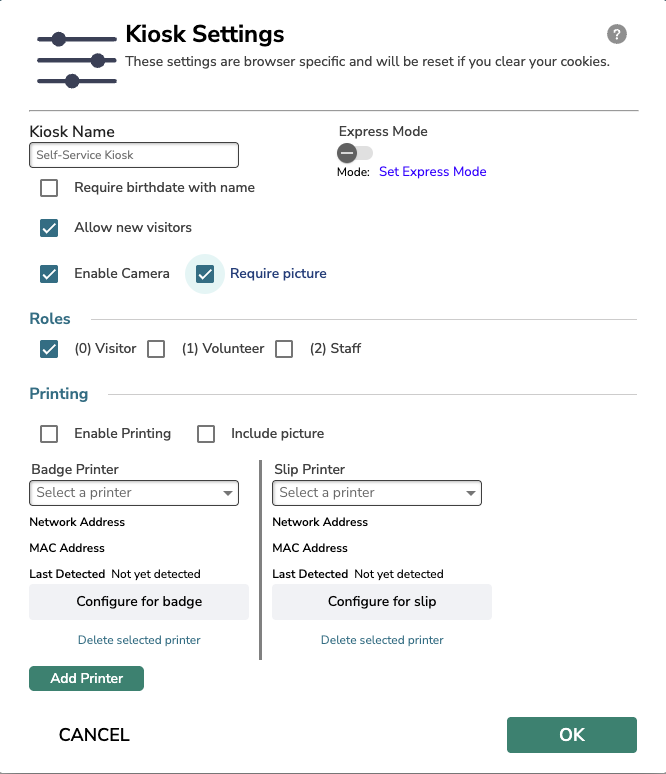
- Kiosk Name. Mostly for your reference only. It may be used in some alerts to help identify where a problem has occurred.
- Require birthdate with name. Turn this ON for better security and fewer ‘duplicate’ matches (when people share the same name). See also Why Require a Birthdate.
- Allow new visitors. Use this to let people create records quickly when signing in. Usually you will want this on for attended kiosks, but not for self-service, depending on the purpose of your kiosk. Note that an operator does not require access to add people in Users Management for new users to be added here.
- Enable Camera. Select to enable camera allowing users to take a photo.
- Require a picture. Make photos required. Enable Camera must be selected to require a picture. If this is selected and an existing visitor signs in who does not have a photo, they will be prompted to take one.
- Express Mode. See below.
- Roles. Pick the roles allowed to sign in at this kiosk. You’ll also need Activities for those roles.
- Enable Printing. If you are registered for printing and want to print badges, you can turn this on. Badges help you identify the visitors walking around your site.
- Include picture. Turning this ON prints a picture on the badge, if the visitor has a picture.
- Select a printer to use, or Add a new printer.
- Set up separate Badge Printer and/or Slip Printer.
- Find the printer install guide on the add-ons page
Express Mode
Express Mode lets you pre-set the kiosk so people can sign in to the same activity very quickly. You can set Express Mode for an attended or a self-service kiosk.
To set Express Mode, open Kiosk Settings.
When you toggle Express Mode, you are presented with regular steps just like you were a user signing in…but actually you are setting your mode. Choose a Role and Activity to be the ‘default’ for this station.
Signing in when in express mode is essentially the same as standard mode—that is, it has the same field options, the same errors, and the same rules. The difference is that the role and activity are pre-set, so users only have to go through step 1 (scanning their barcode or entering their name). This allows you to process a large number of people quickly.
Quick Reports
At Attended kiosks, your operators have access to a limited set of reporting options. From the topnav, select the user menu (the site name, or your avatar) and choose Quick Reports.
Who’s here now report
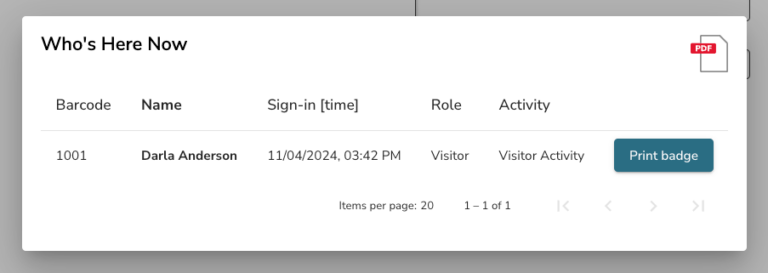
See at a glance who is signed in to your site (across all kiosks). Click the PDF icon to download the report.
This is also where you can reprint a badge for any visitor.
See also
Kiosk Builder
Set up the look of your kiosks.
Security
Configure operator kiosk access.
Security Checks
Run checks on visitors as they sign in to kiosks.

KeepnTrack Hub
Your landing page.

Kiosk Mode
Learn how to set up a device in kiosk mode.